Tutorials StilHub.

Learn to use StilHub step by step, from the client app, with video tutorials, to the complete Business panel guide, with real screenshots from every section.

Tutorials video

Two short clips that show you how to search for salons, pick a service and book in a few taps, from A to Z.

1

App features

Discover everything StilHub offers: from finding salons on the map, to choosing the service you want, picking the right time, and confirming your booking, all in just a few taps.

Search Bookings Payments Locations
2

Quick overview

A short video guide showing how easy it is to book with StilHub. In under a minute, see the whole process from A to Z.

Fast Mobile Easy

The complete guide to the business panel

Every feature of the StilHub admin panel, explained step by step, with real screenshots. Access the panel at stilhub.ro/business and log in with your salon account.

01

Calendar

The heart of the panel, every booking of the day, per staff member, on one screen.
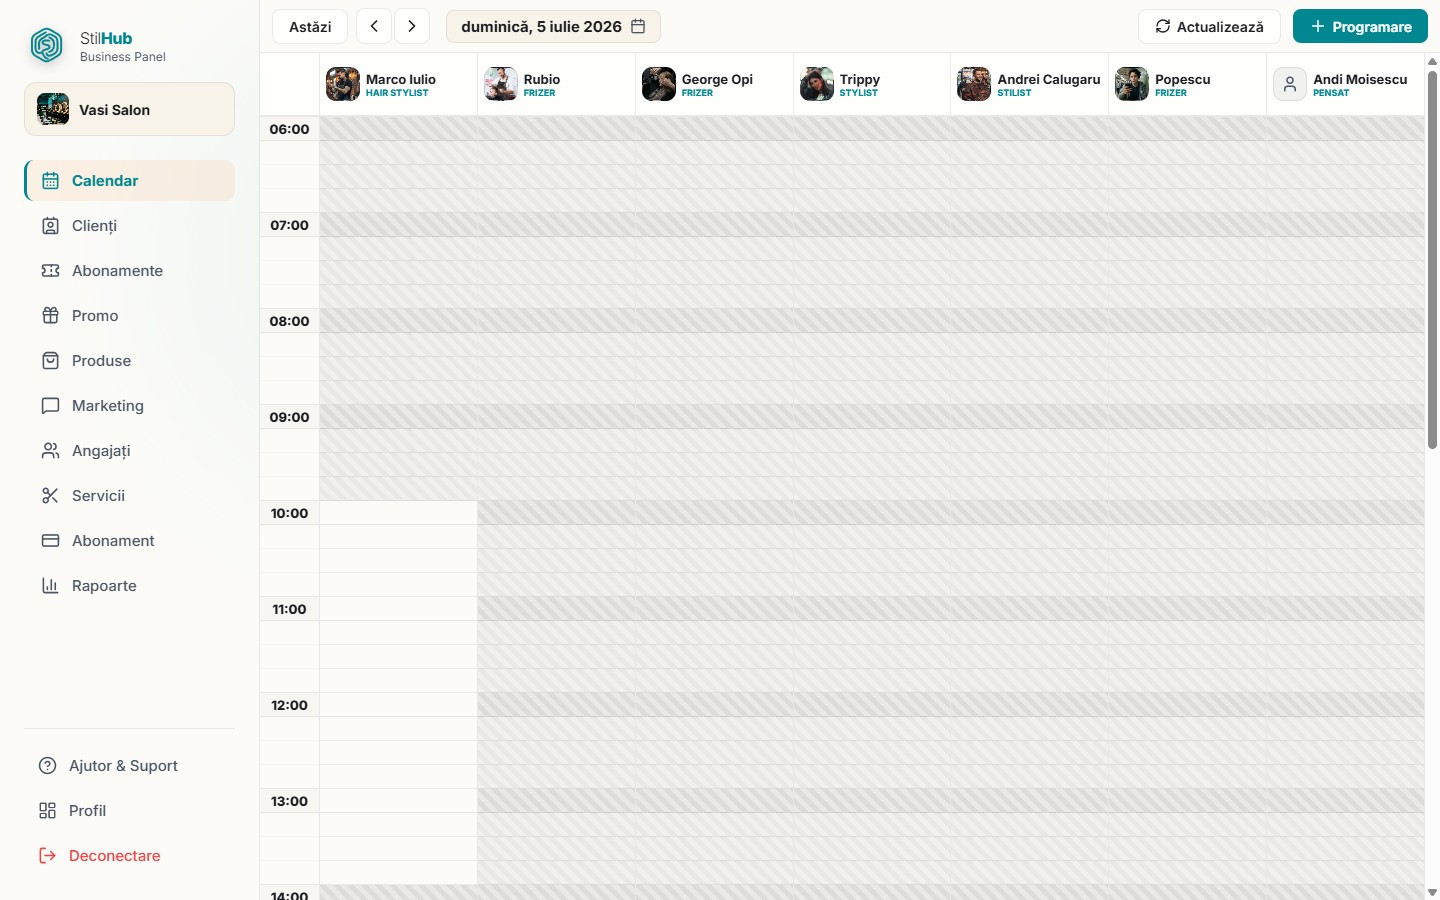
The StilHub business panel calendar, with bookings displayed in columns per staff member

What you see here

The calendar displays the day's bookings in columns, one column per staff member, with their name and role at the top of the column. Times run vertically, from 06:00 to 24:00, divided into 15-minute slots. Hatched (grey, striped) areas are outside the staff member's working hours, while white areas are the intervals when they can take clients. A horizontal red line shows the current time. Each booking is a colored box depending on its status: teal for confirmed, orange for pending, grey for cancelled, and yellow for a blocked interval. There may also be a red column with unassigned bookings, those without a staff member set, or whose staff member was deleted.

At the top is the toolbar: the "Today" button takes you back to the current day, the arrows on the left/right move to the previous or next day, and tapping the displayed date opens a calendar you can use to jump straight to any day. The "Refresh" button reloads the bookings (it also reloads automatically when you return to the panel after a break), and "+ Booking" opens the new booking form.

How to add a booking

  1. Tap directly on a free slot in the staff member's column, the form opens with the staff member and time already filled in, or tap "+ Booking" in the top right.
  2. Fill in the client's name and, optionally, the phone number (07xx xxx xxx). For a walk-in client, simply write the name and number here.
  3. Choose the staff member and the service. The price and duration are filled in automatically and use the staff member's own values, if they have a custom price or duration set for that service.
  4. Check the date, time and, if needed, adjust the duration (in minutes). The "Amount due" box shows the total, with the promotion discount struck through if applicable.
  5. Tap "Save". The booking appears immediately on the grid.

If a required field is missing, it's highlighted in red and a message appears in the form, fill it in and save again. The "Save" button is protected against double-tapping, so you don't accidentally create two identical bookings.

How to move, edit or cancel a booking

Tap a booking to open its details. From there you can change the client, service, staff member, date or time and tap "Save"again. To move it quickly, drag the box onto another slot or column, it repositions itself in place, on the new staff member and at the new time. To stop it, use "Cancel booking" (it stays visible on the grid, in grey, as history) or "Delete booking" (it disappears completely); both ask for confirmation first.

Tip: When two active bookings overlap, they appear yellow-orange with a "Conflict" label, a clear visual signal that you need to reschedule one of them.

A staff member's weekly view

Tap a staff member's name at the top of the column to switch from the current day to their entire week (Monday - Sunday), with today highlighted. In this mode, the arrows navigate from week to week, and the hatched areas show the staff member's schedule for each day. Tap the back arrow (or the "All staff"button) to return to the day view with all columns.

Sending the confirmation SMS and calling

When you open a booking that has a phone number filled in, two buttons appear next to the phone field: a green one that calls the client directly and one teal that sends them a confirmation SMS. The SMS can only be sent after the booking has been saved and uses up one SMS credit from the salon's account; if you try to send it on a booking that hasn't been saved yet, you're told to save it first.
Tip: The duration can be adjusted at any time from the "Duration" field, the box on the grid automatically changes height so you can see at a glance how much time the booking takes up in the day.
02

Clients

Your client base, from bookings, added manually or imported from Excel.

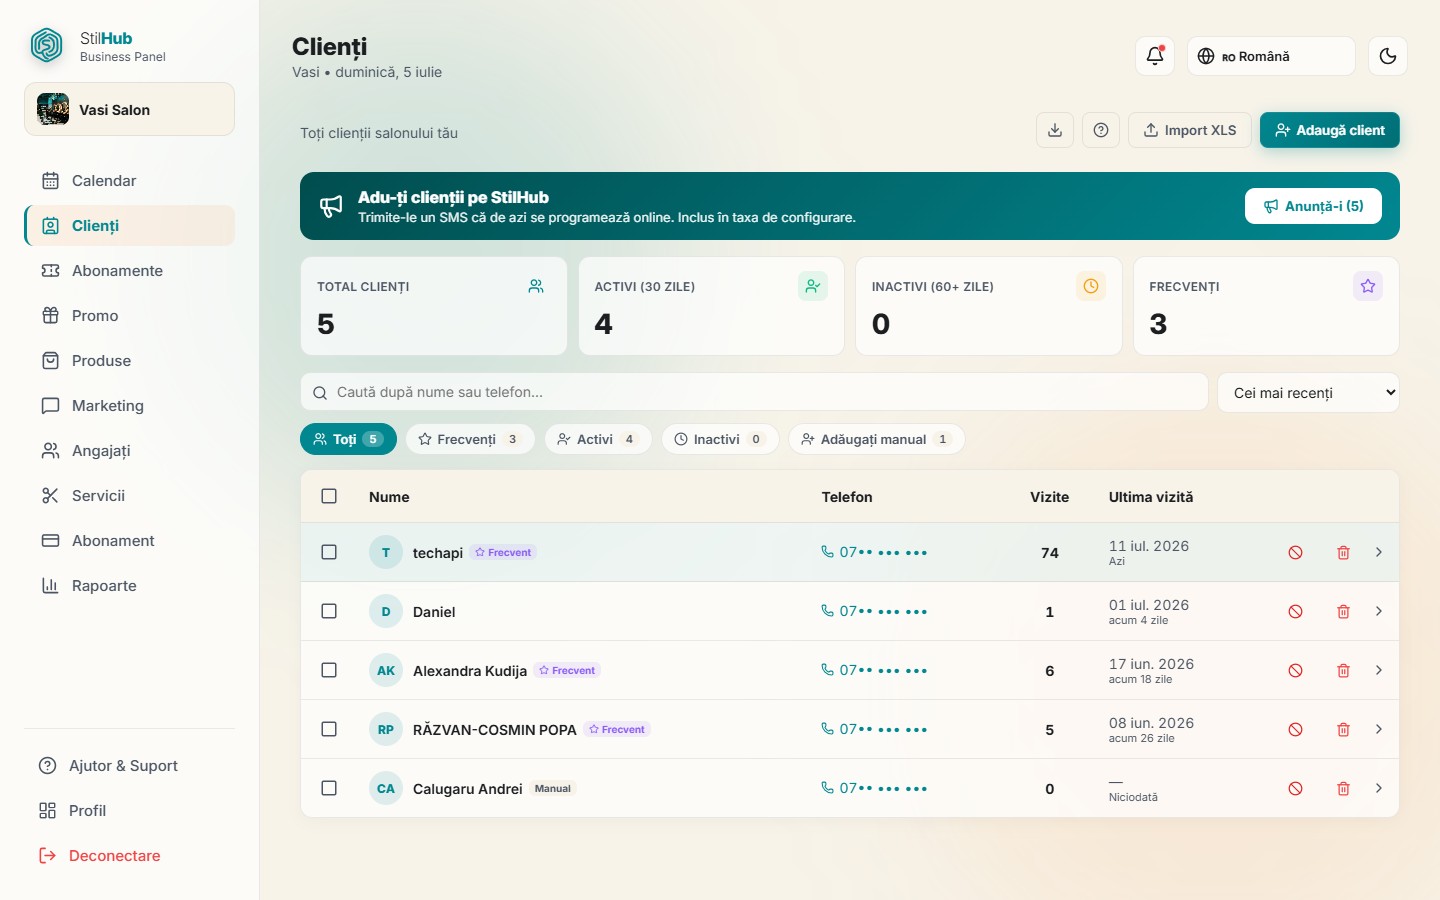
The client list in the StilHub panel, with stats and filters

What you see here

This is your client base, automatically gathered into a single list from three sources: those who booked through the app, those added manually and those imported from Excel. Clients with the same phone number are automatically merged, so they don't appear twice.

At the top are four stat cards: Total, Active (visited you in the last 30 days), Inactive (have a visit, but more than 60 days have passed) and Frequent (at least 3 visits). Below them you'll find the search bar (by name or phone), a sort button (Recent, By name, By visits) and filter chips: All, Frequent, Active, Inactive, Manually added, each with its own count. In the table you see, for each client, the number of visits, last visit and any labels (Frequent, Inactive, Manual/Import source, Blocked). Next to the subtitle there's also an indicator with remaining SMS credits , which turns red when it drops below 20.

How to add a client manually or from Excel

  1. Tap "Add client", fill in the name and the phone number, then Save.
  2. For a whole list, tap "Import XLS" and choose a file .xlsx, .xls or .csv. The system automatically detects the name and phone columns (by header, or by guessing based on the digits) and adds the clients, deduplicated by phone.
  3. If you're not sure about the format, tap the question mark button to see the import tutorial with an example table (columns Name and the Phone).
  4. With the download button you export the current list (as filtered) to an Excel file with name, phone, visits and last visit.

How to send SMS and bring your clients onto StilHub

Check one or more clients in the list and an action bar appears. Tap "Send SMS", write the message and see in real time how many characters you have and how many credits it costs (one SMS per recipient). If you don't have enough credits, you're warned before sending.

At the top, the green banner "Bring your clients onto StilHub" sends a ready-made SMS to all your clients with a phone number (who aren't blocked), letting them know they can book online with you. Check the confirmation that they are your clients and tap send, the first 100 SMS are included in the setup fee.

Tip: Use the filter Inactive for a re-engagement campaign: select clients who haven't visited in 60+ days and send them an SMS with a comeback offer.

How to make bulk auto-bookings

Select the clients and tap "Auto-booking" (or do it for a single client from their profile). In the modal, you can quickly fill all rows with the same values from the "Apply to all" section (service, staff member, date, time), then adjust individually where needed. A staff member is required for each booking.

  1. Choose service and the staff member for each client, plus date and the time.
  2. Write the announcement SMS text (you can use the suggested variables below the field).
  3. Choose when the SMS is sent: now, 2 days before, 1 day before, or on the day of the booking, you can check several.
  4. Optionally, check monthly repeat and choose for how many months; below the button you'll see an estimate of the number of SMS.
  5. Tap Confirm, the actual bookings appear in the calendar, and the SMS messages are sent at the chosen times.

Client profile, blocking and deletion

Tap a row to open the profile on the right. There you see visits, last visit and the booking history (service, staff member, date, status). Use the pencil to edit name, phone number and add notes. You have quick buttons for SMS and auto-booking right from the profile. You can block a client (they won't be able to book at your salon anymore, reversible at any time) or you can delete them permanently, both with a confirmation.

Tip: Notes in the profile are for you only (preferences, allergies, color applied) and remain visible every time you open the client.
03

Memberships

Session packages that clients buy in advance (e.g. "5 haircut sessions").

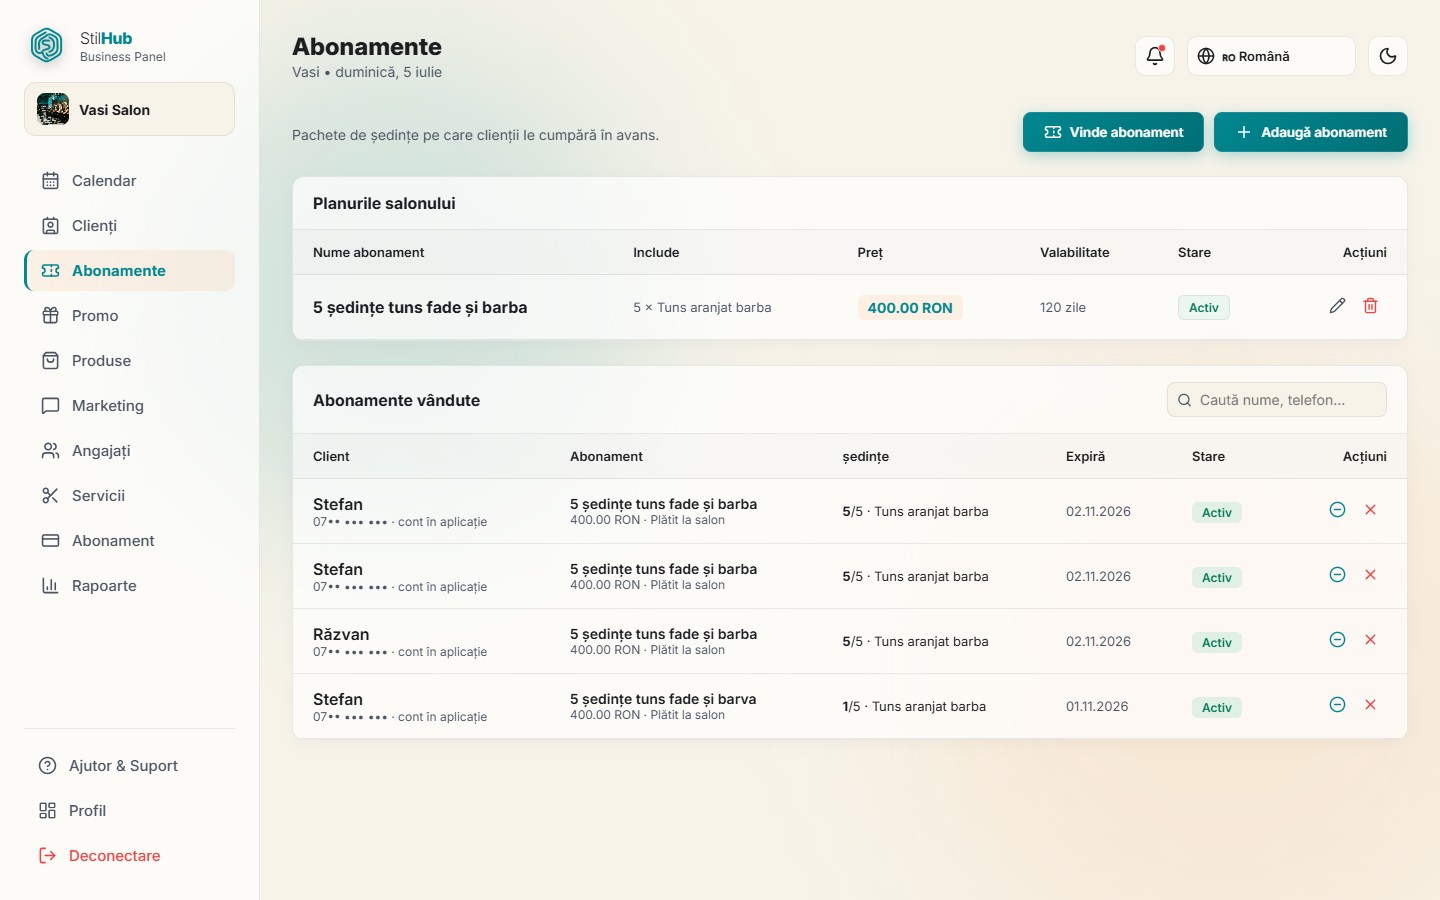
The salon's membership plans and the memberships sold in the StilHub panel

What you see here

Section Memberships lets you sell session packages that clients pay for in advance (for example "5 haircut sessions"). The page has three overlapping areas: Salon plans (your package definitions), Memberships sold (active instances, with session progress and expiry date) and, when they exist, Pending requests, a yellow card with clients who want to pay at the salon.

At the top right you have the Add membership button (always visible) and the Sell membershipbutton, which only appears if you have at least one active plan. In the "Memberships sold" area you also have a search field for search by client name, phone or plan name.

How to create a membership plan

A plan is the template you then sell multiple times. You define it once from the Add membership.

  1. Tap Add membership button and fill in The name of the package and, optionally, a description.
  2. Fill in The price in RON and choose the Validity from the list (30, 45, 60, 90, 120, 180 or 365 days; 90 by default).
  3. At Includes you add the services in the package: for each row you choose the service and the number of sessions. With Add service you add new rows, and the trash icon removes a row.
  4. Tap Save. The plan appears in the "Salon plans" table and in the app's showcase.

In the plans table you see the name, included services, price and validity. With the status button you switch the plan between Active and the Inactive (inactive plans can no longer be sold), and with the icons on the right you can edit (pencil) or delete.

How to sell a membership at the counter

The button Sell membership records a membership on the spot, useful when the client pays directly at the salon.

  1. Tap Sell membership and choose the Plan from the list (only active plans appear, with the price). Below the selector you see the included services and validity.
  2. Fill in The client's name (required) and, optionally, phone number.
  3. Tap the confirm button. The membership becomes active immediately and, if you enter the phone number, it's automatically linked to the client's account in the app.

How to confirm pending requests

When a client chooses in the app to pay at the salon, the request appears in the Pending requestscard, with the name, phone, plan, price and request date.

  1. When the client pays, tap Confirm payment, the membership moves to "Memberships sold" as active.
  2. If you decline, tap Reject and confirm in the warning window.

How to track and use up sold memberships

In "Memberships sold" you see each membership with the client (and the Linked label if they have an app account), the plan, payment method (card or at the salon), remaining sessions for each service, expiry date and status.

  1. For a walk-in client, tap the minus icon to deduct a session; in the window that opens, tap the desired service, where you also see how many sessions remain.
  2. With the X icon you cancel an active membership, after confirmation.
Tip: The session is deducted automatically when the client books using the membership, and it's refunded if the booking is cancelled, manual deduction is only for clients who don't book through the app.
Tip: When all sessions have been used, the membership gets the Used up badge and moves below the active ones, but remains visible as history.
04

Promo

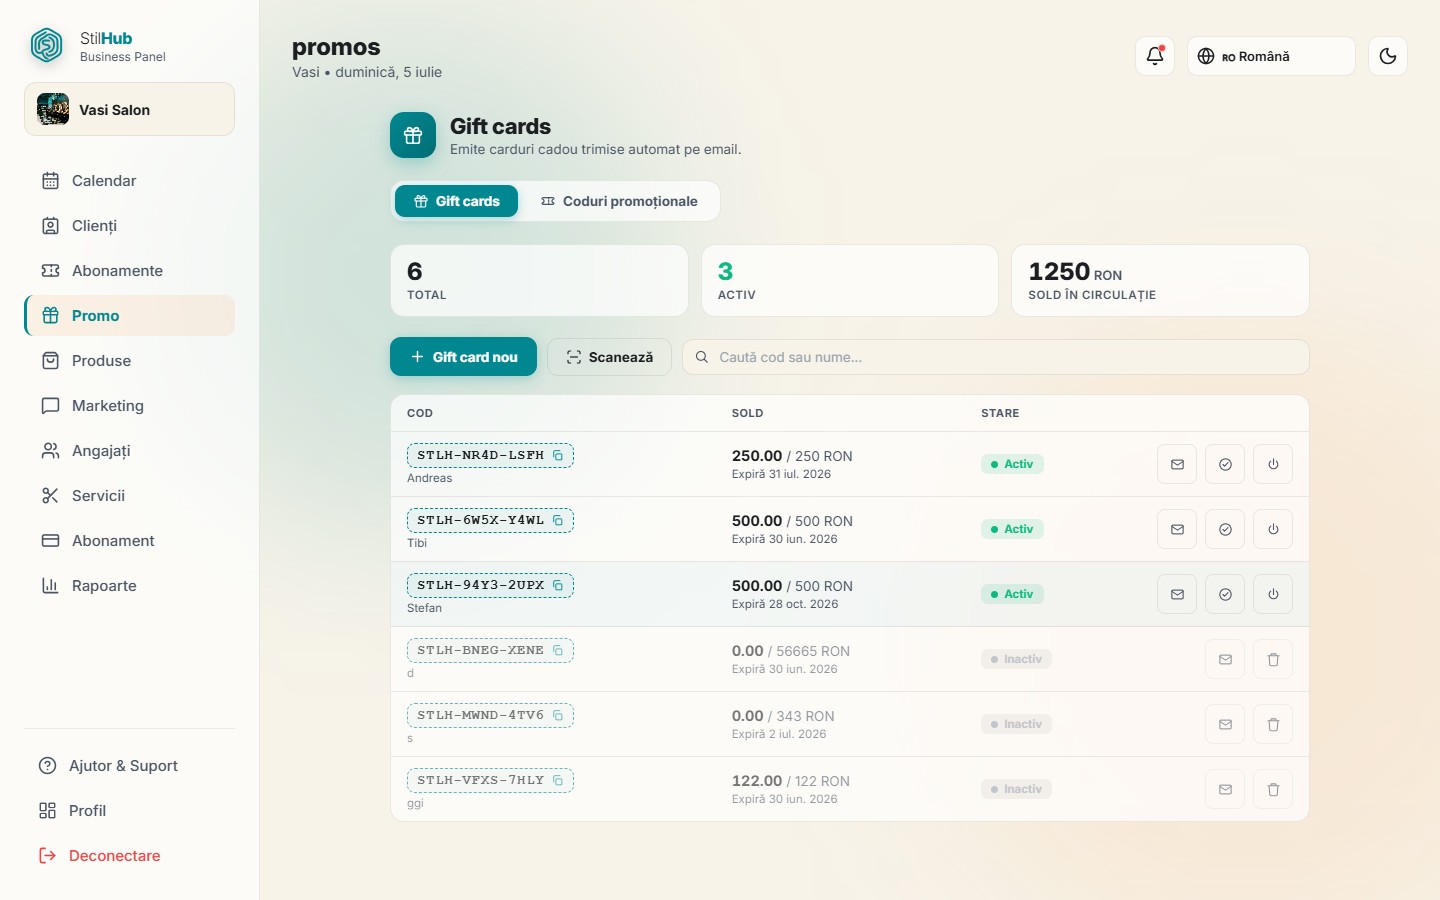
Gift cards with QR codes and discount codes, two tools in separate tabs.

Gift cards and promo codes in the StilHub panel

What you see here

Section Promo gives you two sales tools, split into separate tabs at the top: Gift cards and Promo codes. When you open the page, you're on the gift cards tab by default; tap the other tab to switch to the discount codes.

On each tab you have three stat boxes at the top. For cards you see how many cards you've issued in total, how many are active and the the balance in circulation (the amount in RON that clients can still spend). For codes you see the total number of codes, how many are active and how many uses have been recorded. Below the stats you have a search box that filters the list instantly as you type, for cards it searches by code, buyer name or email, and for codes by code or description.

How to issue a gift card

Tap "New gift card", the form opens and you fill in the fields. The only required one is the value.

  1. Fill in The value of the card in RON (e.g. 100).
  2. Optionally, add the buyer's name, the buyer's email, the recipient's email, an expiry date and a custom message .
  3. Tap "Issue card". The system automatically generates a code in the form STLH-XXXX-XXXX.
  4. If you filled in an email (recipient's or buyer's), the card is automatically sent to that email, with a QR code attached. Without an email, the card just stays in the list and you can send it later.

How to redeem a card at the counter

When the client comes with the card, tap the "Scan" button on the cards tab.

  1. Allow camera access and point the client's phone at the lens to read the QR code. If the camera doesn't work, type the code manually into the field STLH-XXXX-XXXX and tap "Search".
  2. The found card is displayed with its available balance. Fill in the amount to use, or tap "Use all" to pass the entire balance.
  3. Tap "Apply". The amount is deducted from the balance, and if the balance reaches zero the card deactivates itself.

How to manage issued cards

In the cards table, each row shows the code (tap it to copyit), the balance remaining from the initial value, the expiry date and the status (Active / Inactive). Cards without an email get a visible warning. At the end of the row you have quick buttons:

  1. Resend email, sends the card again with the QR code; if it has no saved email, it asks you for one on the spot.
  2. Mark as used, appears only for active cards with a balance; it closes the card and brings the balance to zero.
  3. Deactivate, stops an active card; after deactivation the button becomes Delete, so you can remove it from the list for good.
Tip: The "balance in circulation" stat tells you how much you still owe your clients, money you've collected from selling cards, and which you'll cover with services.

How to create a promo code

Switch to the Promo codes and tap "New code"tab. The code, type and discount value are required.

  1. Fill in The code (automatically converted to uppercase) and choose the type: a percentage discount or a fixed amount.
  2. Fill in the value discount, and optionally the minimum order, the usage limit, an description and the validity period (from / to).
  3. Tap "Create code". The client applies it when finishing the booking in the app.

Each code in the list shows the discount, how many uses have been used up out of the limit (with a progress bar when you set a limit) and the expiry date. With the buttons next to it you can deactivate/activate it at any time, or delete.

Tip: Use the minimum order to offer the discount only on bookings above a certain amount, and the usage limit to stop the code automatically after a number of uses, useful for short campaigns.
05

Products

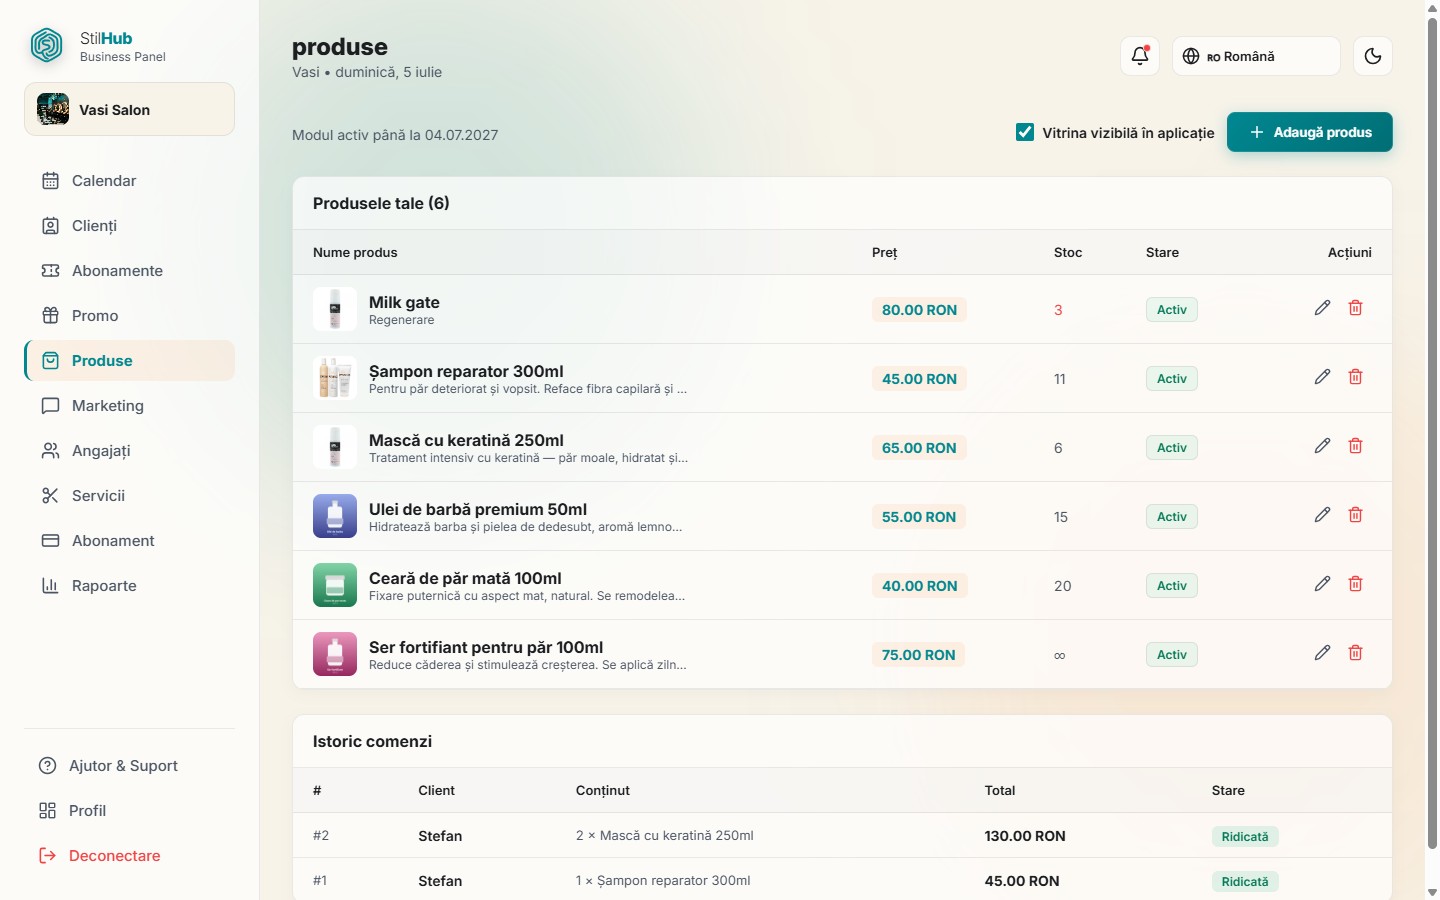
Sell products in the app with pickup from the salon (click & collect).

Product showcase and order history in the StilHub panel

What you see here

Section Products turns your salon into a small shop within the app: you sell retail products (shampoos, wax, oils, masks, styling products, etc.) that the client orders from their phone and picks up from your salon, a click & collectmodel, no delivery. It's an add-onmodule, meaning a separate feature that's activated alongside the regular subscription.

As long as the module isn't active, the page shows a presentation with the benefits, the monthly price (in RON / month) and the activation steps. After activation, the same page becomes the shop's admin panel: orders to process at the top, the product list in the middle and the order history at the bottom.

How to activate the module

Activation doesn't happen automatically: you send a request, and the StilHub team confirms it. The button you see depends on the state of your account.

  1. Open the Products section from the menu. If you have an active subscription, tap the button "Request activation".
  2. If you see the message that you need an active subscription, first activate/renew your subscription in the Subscription section, then come back here.
  3. After you send the request, a banner appears saying "Request sent" with the date you requested it, from here you wait for confirmation.
  4. When the module is active, at the top you see how long it's valid until ("Active until…") and you have access to all the tools below.

How to publish the showcase and add products

For the products to be visible to clients on the salon page in the app, check the switch "Showcase visible in the app". You can uncheck it at any time to temporarily hide the whole shop, without losing your products.

  1. Tap "Add product" (or "Add first product" if the list is empty).
  2. Add a photo: click the image square and choose a file, it's automatically compressed to WebP format, so it loads fast. You can always tap "Change image".
  3. Fill in The name (required), a Description short one (optional) and The price in RON (required).
  4. At Stock enter the number of units available, or leave it empty for unlimited stock (shown with the symbol). Tap Save.

In the list, each product can be edited (pencil), deleted (trash, with confirmation) or toggled between Active and the Inactive with a single click, to take it off sale without deleting it.

Tip: A stock of 3 units or fewer is highlighted in red as an alert, a sign that it's time to restock the product.

How you manage orders (click & collect)

New orders appear at the top, in the "Orders to process"box, with the order number, customer name and phone, requested products, total, and payment label: "Paid online" discount or a "Pay on pickup".

  1. When you're preparing the order, you press "Mark as ready", the order moves from Confirmed to Ready, and the customer is notified they can pick it up.
  2. When handing over the products, you press "Mark as picked up". At this point the stock is automatically deducted from inventory.
  3. If needed, you press "Cancel order". For orders paid online, the confirmation warns you that the amount will be refunded to the customer.

Completed or cancelled orders move down into "Order history", where you can find them anytime with status Picked up discount or a Cancelled, along with the contents and total of each one.

Tip: Stock is deducted at pickup, not at order placement, this way the number of units stays correct even if a customer cancels before picking up.
06

Marketing (SMS)

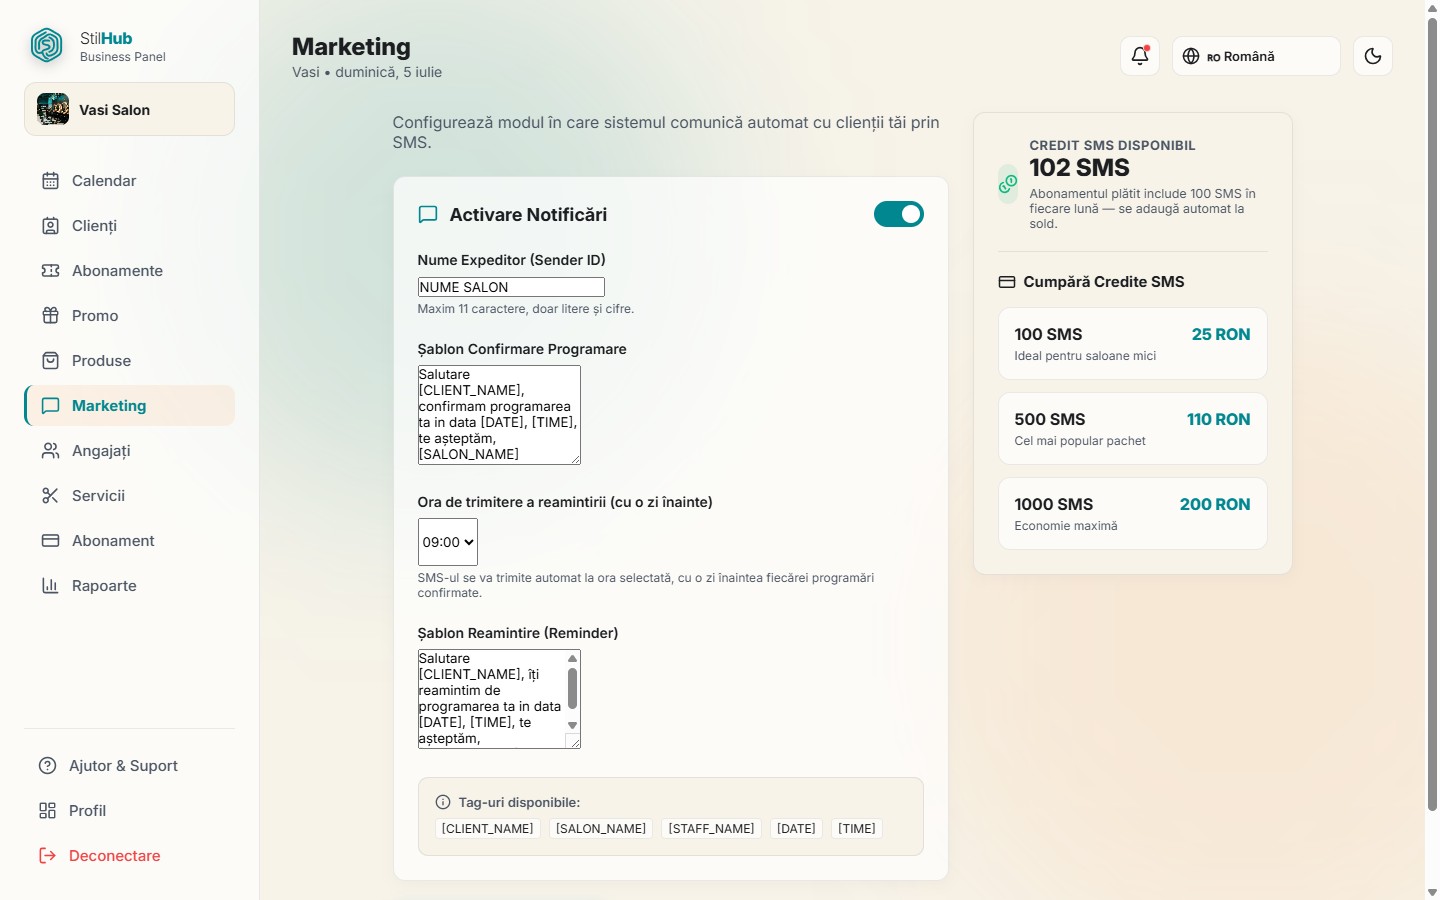
Automatic SMS notifications, confirmation on booking and a reminder before the visit.

SMS notification settings and credit packages in the StilHub panel

What you see here

Section Marketing (SMS) is where you start SMS notifications to customers: a confirmation message as soon as a booking is made, and a reminder message the day before the visit. The page has three areas: a large activation toggle with all the settings below it, a card on the right showing your SMS balance available, and, also there, the credit packages you can purchase.

As long as the toggle is off, the fields remain visible but dimmed and locked, they only become editable once you turn notifications on. Everything you change here (sender name, templates, reminder time) is saved with a single button.

How you turn on automatic SMS notifications

  1. You press the "Enable Notifications" toggle at the top of the card, only now do the fields below become editable.
  2. Fill in "Sender Name (Sender ID)": the name that appears as the message sender on the customer's phone. It can have a maximum of 11 characters and is automatically converted to uppercase as you type.
  3. You press the "Save" button to save the settings. The button only works when notifications are enabled.
Tip: Set your salon's name as the Sender ID, short and recognizable (for example STILHUB), the customer immediately sees who's writing to them and won't ignore the message.

How you customize the message templates

You have two separate templates, each in a resizable text field: "Confirmation Template" (the message sent when the booking is made) and "Reminder Template" (the message sent before the visit). In the text you can insert tags that are automatically replaced with the real data of each booking.

The available tags, listed in the card below the templates, are: [CLIENT_NAME] (the customer's name), [SALON_NAME] (the salon's name), [STAFF_NAME] (the staff member), [DATE] (the date) and [TIME] (the time). You write them directly in the text, with square brackets, exactly as they appear.

  1. You write the confirmation message in "Confirmation Template", using the tags wherever you want personalized data.
  2. From the dropdown list "Reminder sending time" you choose the time (between 07:00 and 20:00, on the hour), the reminder SMS is sent automatically at the chosen time, one day before each confirmed booking.
  3. You write the reminder message in "Reminder Template", also with the tags you need.
  4. Tap "Save".

How you check the balance and buy SMS credits

In the card on the right you see "SMS balance", how many credits you have available right now. Each message sent (confirmation or reminder) uses one credit, so if the balance reaches zero, messages stop going out. Below the balance you'll also see a note that a paid subscription includes 100 SMS every month, which are added to your balance automatically after the first payment.

  1. You check the value in "SMS balance" to know how many credits you have left.
  2. At "Buy credits" you choose one of the displayed packages (for example 100, 500, or 1000 SMS), each with its own price in RON.
  3. You press the card of the package you want, you're redirected automatically to the secure payment page.
  4. After payment you return to the panel, and a message confirms that your balance has been topped up.
Tip: Estimate how many bookings you have per month and keep a balance above that number, double it if you use both the confirmation and the reminder, so you don't run out of credits exactly when you need them.
07

Staff

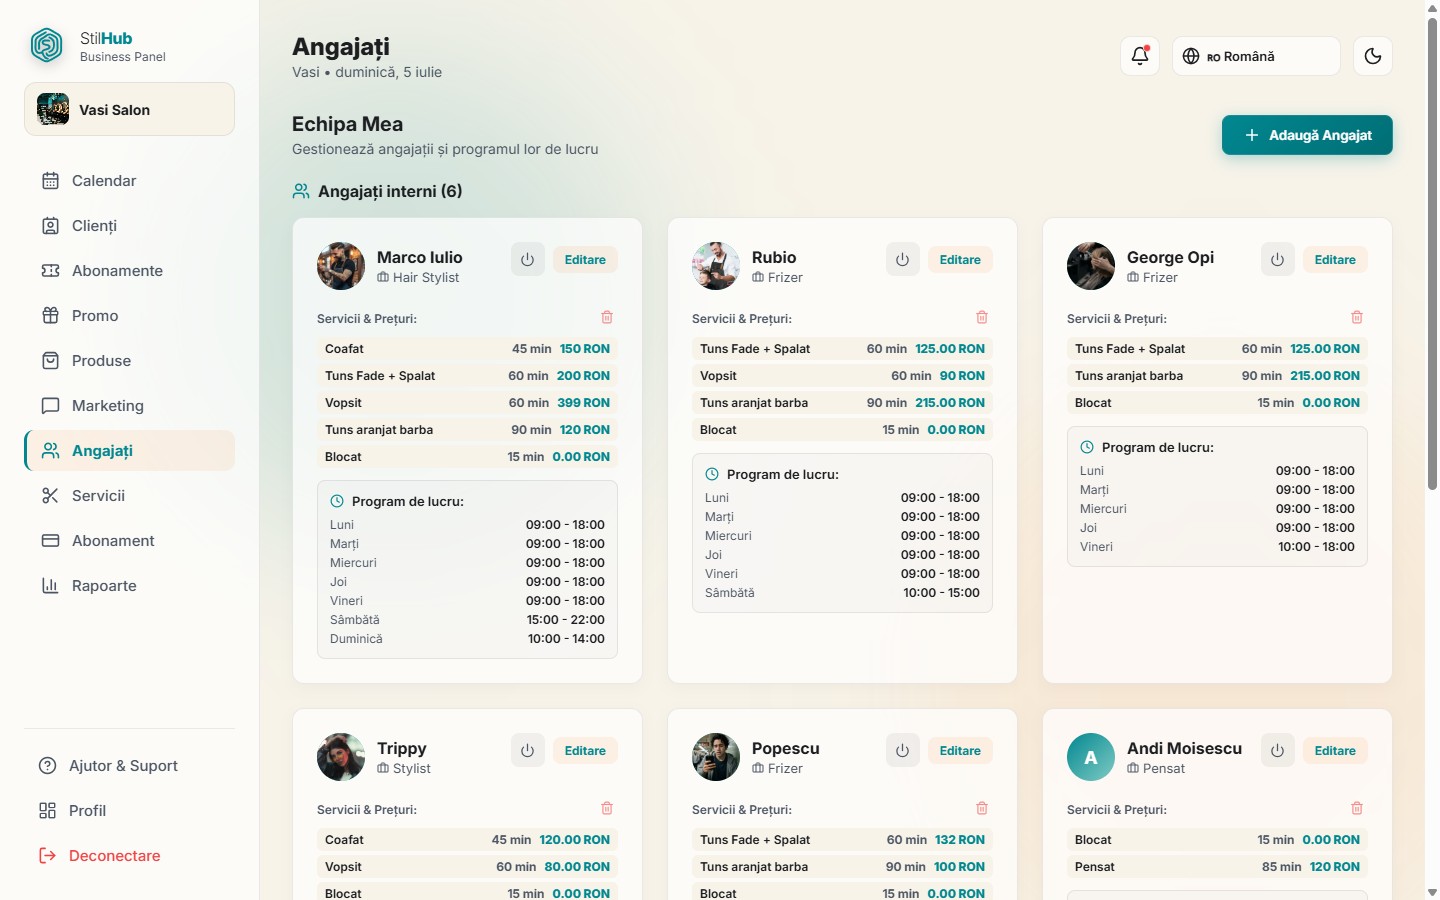
Your salon's team, services, prices, commission, and working schedule per staff member.

Staff cards with services, prices, and working schedule in the StilHub panel

What you see here

Section Staff is your salon's team. Each person has their own card with a photo (or the initial of their name), their name, role, the list of services they provide with price and duration, and their working schedule by day. At the top you'll find the Add Staff.

The cards are grouped: Team (internal staff), External Collaborators (approved freelancers, marked with a distinct label) and, when applicable, an area Freelancer Association Requests, where an independent specialist requests to work at your salon and you decide with Approve discount or a Reject. A staff member temporarily on leave appears dimmed, with the label Inactive.

How you add or edit a staff member

You press Add Staff (or Edit on an existing card) and the configuration window opens.

  1. You press the circle and Upload photo; the image is cropped square before saving. The photo is optional.
  2. Fill in The name (required) and Role (e.g. Hairdresser, Stylist). If you leave the role blank, it gets a default name.
  3. You optionally add a Phone contact.
  4. You set Commission (%), a number between 0 and 100 (e.g. 30). Left blank means no commission; the value then appears in the staff member's monthly report.
  5. Tap Save.

How you set the services, price, and duration per staff member

In the same window you check the services the staff member performs. For each checked service, two fields appear: a price in RON and a duration in minutes, customized for that staff member. If you leave them blank, the service's standard values are used (shown as a suggestion in the field).

Here you can also upload a photo gallery of the staff member (up to 5 images, automatically compressed) and, when editing, a video portfolio. The video (MP4 or MOV, max 100MB) is reviewed by the StilHub team within 1 - 2 days before publication.

Tip: The price and duration can differ from one colleague to another, a senior stylist may have a different rate and a different execution time for the same service.

How you set the working schedule and lunch break

For each day of the week (Monday - Sunday) you check whether the staff member works and choose the start and end time from the lists (30-minute intervals, between 06:00 and 22:00). An unchecked day appears as a Day off.

  1. You check the working days and choose the start and end times.
  2. Optionally, check Lunch break for an active day and choose the interval (default 13:00 - 14:00).
  3. You save. The system does not allow customers to book during the break or outside working hours.

The end time must be after the start time, and the break must fit within the schedule, otherwise you get an error message when saving.

Leave: temporary deactivation without deletion

When a staff member goes on leave, you use the activate/deactivate button on their card. The staff member disappears from customer bookings and is no longer billed, but their data, services, and schedule remain saved, ready to be reactivated. The Delete button removes them permanently.

Tip: For leave or a short break, use temporary deactivation, not deletion, when they return you reactivate the card with the entire schedule intact.
08

Services

The list of your salon's services, name, price, and duration.

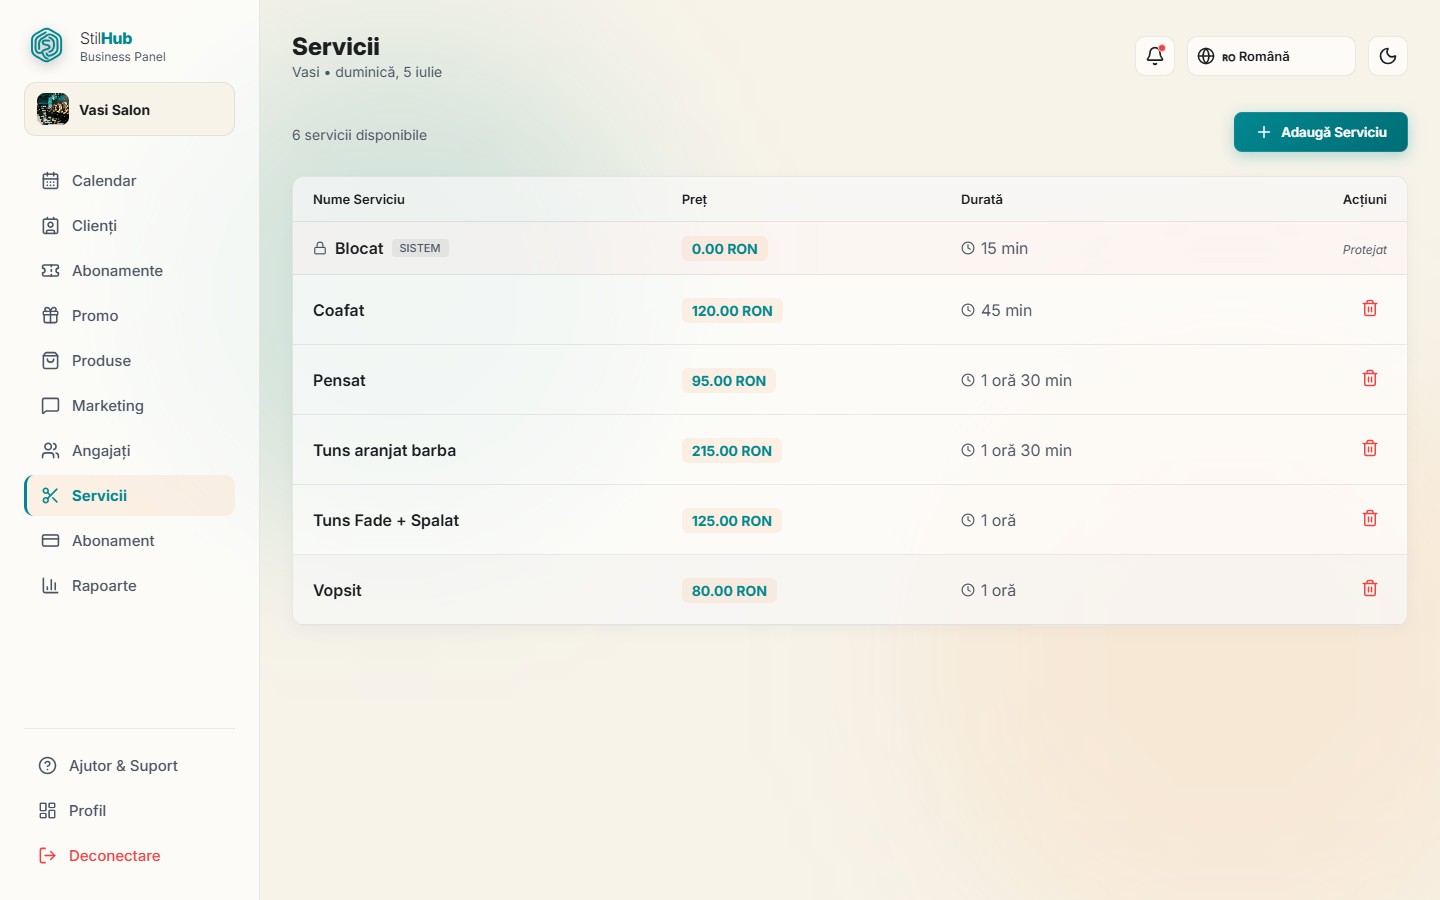
The salon's services table in the StilHub panel

What you see here

Here you have the complete list of services your salon offers, exactly the ones customers can choose when booking and that you assign to staff members. At the top, below the title, you see how many services you have ("X services available"), and on the right the Add Service.

For each service you see three pieces of information: Name, Price and the Duration. The price appears colored (if it's 0, Free is displayed instead of an amount; otherwise it appears as "X RON"), and the duration appears next to a clock icon, formatted in a friendly way (for example "45 min", "1 hour", or "1 hour 30 min"). On desktop the list is displayed as a table with the actions column on the right; on phone the same services appear as cards, easier to scroll through with your finger. If you haven't added any service yet, you see an empty message with the Add first service.

How you add a service

You press Add Service and a window with three fields opens. You fill them in and save, the service appears immediately in the list.

  1. At Service name you write the clear name the customer will see (for example "Haircut and beard" or "Gel manicure").
  2. At Price you put the amount in RON. The field also accepts decimals, and the minimum value is 0, if you leave 0, the service will display as Free.
  3. At Duration you choose from the list how long the service takes. You have options in 15-minute increments, from 15 min to 8 hours (the default value is 30 minutes).
  4. Tap Save (the button shows "Saving..." while it's being recorded). You can close the window anytime with Cancel, with the X button in the corner or with the Escape.

If the name or price is missing, the save doesn't happen; for any other error a red message appears in the window, and the entered data remains in place.

Why duration matters

Duration isn't just informational: it determines how long the service occupies the calendar and, implicitly, what free slots appear to customers when booking. A 60-minute service blocks an hour-long interval, so two customers can't be booked overlapping on the same staff member.

Tip: Set the duration as close to reality as possible (include preparation and cleanup time too). Too short a duration leads to overlaps and delays; too long leaves your calendar with unnecessary gaps.

How you delete a service

Next to each service, in the actions column (on phone, in the service card), you have the delete button (the trash bin icon).

  1. You press the delete button next to the service.
  2. You confirm in the window that appears, this is a permanent action.
  3. After confirmation, the service disappears from the list. If an error occurs, you get a message and the service remains in place.

The "Blocked" service (system)

You'll notice in the list a special service called Blocked, marked with a lock and the SYSTEMlabel, on a slightly highlighted row. It isn't a real service for customers: you use it in Calendar to block off an interval (break, travel, a phone booking) without creating an actual appointment.

Because the panel depends on it, "Blocked" is protected: it has no delete button (instead it says "Protected") and cannot be removed. Leave it as it is, it's part of the calendar's blocking mechanism.

Tip: Don't add your own service called "Blocked" to avoid confusion, use the existing system service directly from Calendar when you want to keep an interval free.
09

Subscription

Your StilHub subscription, status, cost, billing, and online payments.

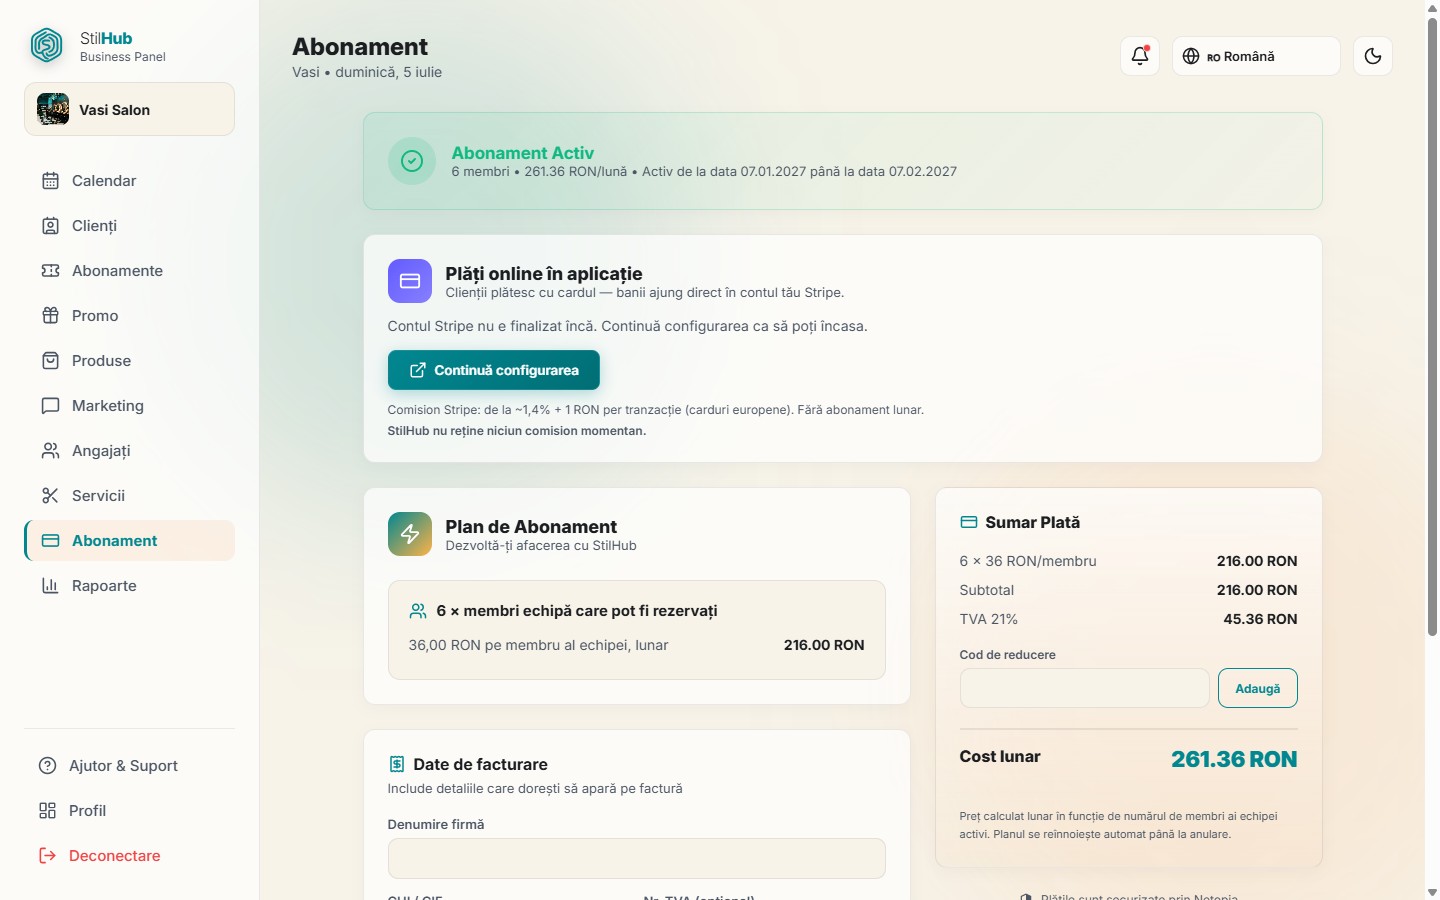
Subscription status, payment summary, and online payment setup in the StilHub panel

What you see here

This is the page for your subscription to StilHub (not your customers' subscriptions). At the top, in a colored banner, you see the account status: trial period (with the number of days remaining and the renewal date), active subscription (green, with the billing interval) or trial expired (red, when the salon is no longer visible in the app). Below that you have the plan card, billing details, invoice history, the payment summary on the right, and, separately, the card for online card payments.

How you understand the cost and payment summary

The cost is calculated automatically based on the number of team members who can be booked. In the plan card you see {number} × Team member at 36.00 RON/member per month. In the Summary panel on the right you have the full breakdown: subtotal, VAT 21% and, on the first payment, Activation fee (99 RON, one time). The bottom line shows either Due now (first payment = subscription + activation + VAT on both), or Monthly cost if the subscription is already active.

Tip: If you see 0 × Team member, the activation button is locked and you get a message to add staff first. Add at least one bookable member on the Staff page, then come back here.

How you fill in your billing details

For your details to appear correctly on the invoice, fill in the Billing detailssection:

  1. Fill in Company name in the first field.
  2. Fill in Tax ID (CUI) and, if applicable, VAT number (CIF) in the two fields below.
  3. You add the Address in the field below.
  4. Tap Save billing details; a green message confirms the save.

How you activate the subscription and view invoices

Optionally, you can enter a Discount code in the summary field and press Add. To pay, you press the large Activate subscription button on the right, you're taken to the payment page, and on return the status refreshes itself. Below the billing details you'll find the collapsible Invoice historysection: you press it to see all invoices, each with description, series and number, date, amount, and status (Paid, Failed discount or a Pending). For paid invoices you have Download invoice (PDF) or View invoice, which opens it for printing.

How you activate online card payments (Stripe)

In the Online payments card you connect your Stripe account so you can charge customers by card directly into your own account. The money goes directly to the salon minus the Stripe fee, while the StilHub commission is displayed transparently (currently no commission).

  1. Tap Connect Stripe, you're taken to the setup page hosted by Stripe, where you fill in your account details.
  2. On return, if onboarding isn't complete, you press Continue setup; when it's finished you see the message Account ready.
  3. You check the box Enable card payments in the app to start accepting payments; you can uncheck it anytime.
Tip: During the trial period the salon is fully functional. After it expires you remain visible in the app only if you activate the subscription, so pay before the trial ends.
10

Reports

Overview, key indicators, booking chart, and team workload.

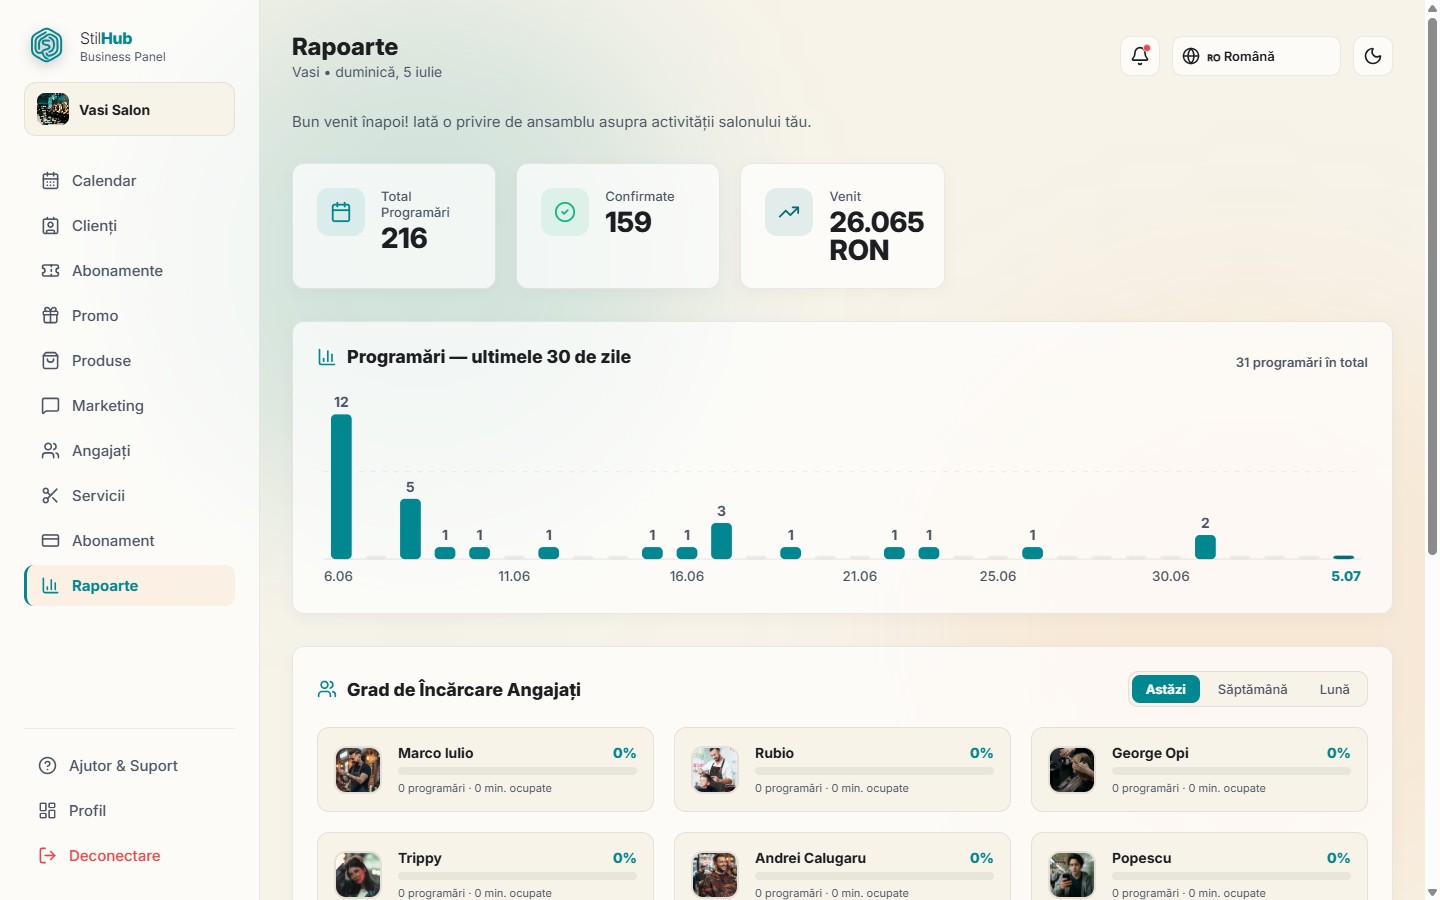
The reports panel with key indicators and the booking chart for the last 30 days

What you see here

Reports is your salon's overview screen. At the top you'll find three key indicators, Total Bookings, Confirmed and the Revenue (shown in RON). Below them you have the "Bookings, last 30 days" chart, the, then workload of each staff member, and, at the end, the detailed monthly report with revenue and commission. If you're a freelancer, the titles become "My Workload" and "My Monthly Report" and you only see your own data.

How you read the key indicators and the chart

The three cards at the top are a quick summary: Total Bookings shows you how many bookings you have, Confirmed how many are confirmed, and Revenue the value in RON. Each card is clickable, if you click it, it takes you directly to Calendar.

The chart below has one bar for each of the last 30 days. The bar for today is colored darker so you recognize it right away, and the total number of bookings for the period appears next to the title. Bookings cancelled bookings don't count, and days without bookings appear as a thin gray line. Swipe with your finger or hover with your mouse over a bar to see the exact date and number of bookings for that day.

How you track your team's workload

The "Staff Workload" section shows you how busy each team member is. You have a toggle with three periods, Today, Week and the Month.

  1. You press Today, Week discount or a Month, depending on the period you want to analyze.
  2. For each staff member you see the avatar, name, occupancy percentage and a progress bar.
  3. Below the bar you read the number of bookings and how many minutes they worked in the chosen period.

When a staff member's occupancy exceeds 80%, the percentage and bar turn red, a signal that the person is near maximum capacity.

How you check the monthly report per staff member

The monthly report breaks down activity by staff member and service. From the month selector on the right you choose the desired month (only months with data appear, and the current month is marked). When you're looking at the current month, a note appears that the data is live, meaning it updates as bookings come in.

  1. You choose the month from the selector in the top-right corner.
  2. You see each staff member with the number of bookings, minutes worked, and total revenue in RON.
  3. If you set a commission on the Staff page, below the revenue the commission line appears (the percentage and calculated amount).
  4. You press a staff member's row to expand it and see the breakdown by service, for each service you have the number of bookings, minutes, and revenue.

How you export the data

Next to the monthly report you have three export buttons for the selected month:

  1. Excel, downloads a .xlsx file with rows per staff member and service, plus totals.
  2. Accounting export, a .xlsx with one line per booking (date, customer, phone, service, staff member, price, status, payment) and the totals for completed and collected.
  3. PDF, opens a print-ready page, with a print button.
Tip: If a staff member consistently exceeds 80% occupancy (red bar), consider redistributing bookings or expanding the team, those are customers you risk losing during peak hours.
Tip: The commission line only appears in the report if you've filled in a commission percentage for that staff member, on the Staff.
11

Profile

The salon's public identity, how customers see you in the app.

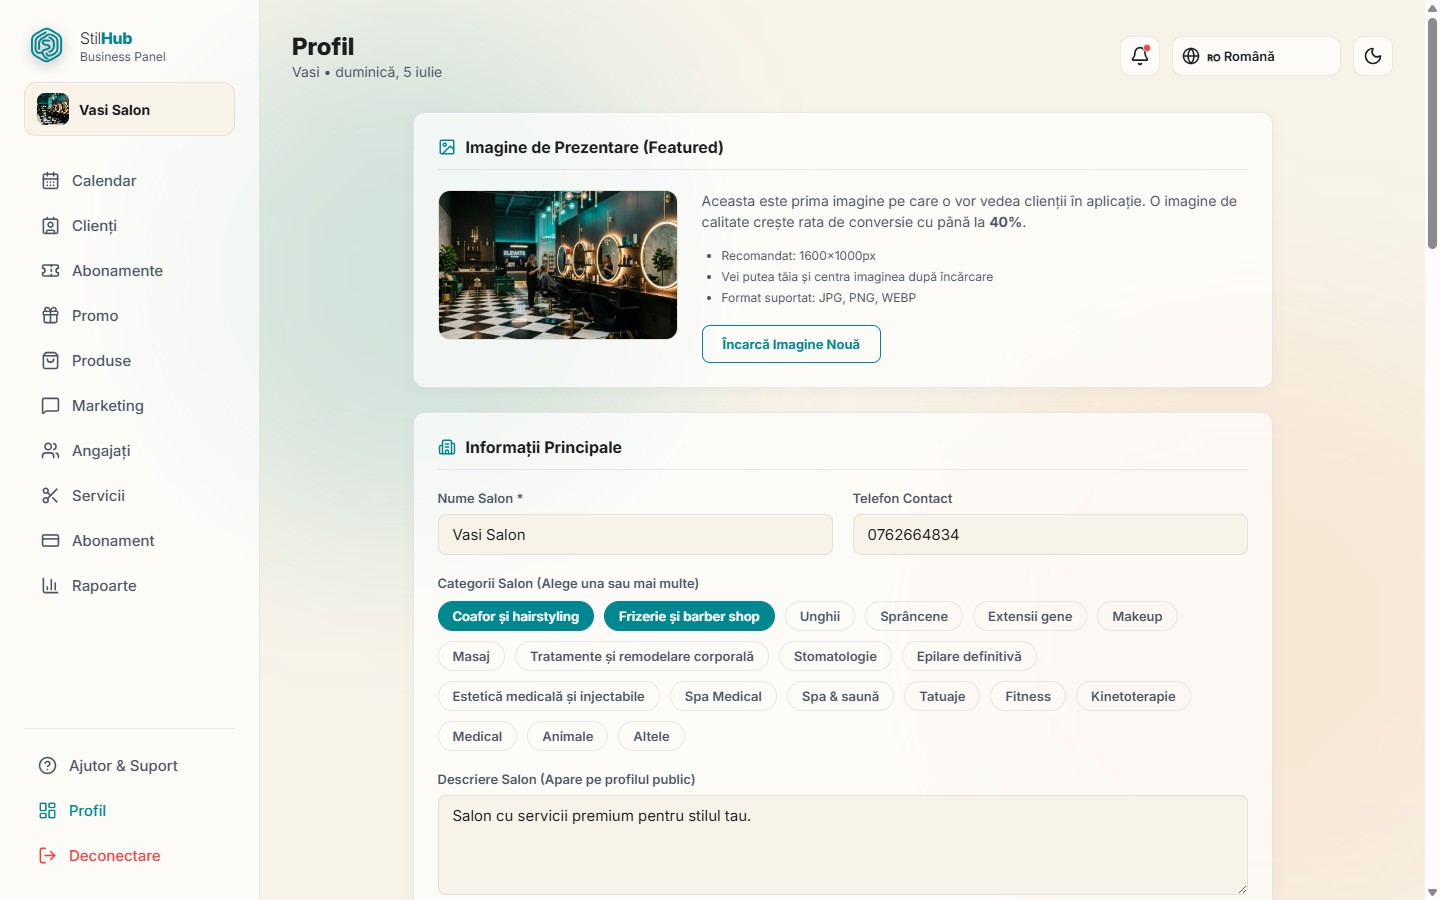
The salon's public profile, showcase image, main information, and categories in the StilHub panel

What you see here

The Profile page is your salon's public identity, exactly what customers see when they search for you in the app. From here you control the showcase image, contact details, categories, description, address on the map, and photo gallery. Here you'll also find the promotional materials with QR code, the Google link, installing the panel on your phone, and changing your password. Important: changes to the profile (image, name, categories, description, address, gallery) only apply after you press the Save button at the bottom of the page, QR, copy link, or password change actions execute immediately, separately.

How you set your image and public information

The first section is Showcase image: you press the image area (or the Upload new imagebutton), choose a photo from your device, then frame it in the crop editor at an aspect ratio of roughly 16:10. The recommended size is 1600×1000px and it accepts the usual image formats, you can move and center the frame before confirming.

At Main information you fill in Salon name and the Contact phone . At Categories you press one or more labels (Hair salon & hairstyling, Barbershop, Nails, Massage, and others), you can choose as many as fit, and the active ones become colored. Below them you write the Public description of the salon and, optionally, the Cancellation policy, which appears to customers when booking.

How you add the address, map, and gallery

  1. In Map location you write the address in the dedicated field; the map centers on it.
  2. You can move the pin directly on the map to fix the exact position, the coordinates are saved automatically along with the profile.
  3. At Photo gallery you press the Upload box and add up to 5 photos; each is automatically optimized before uploading.
  4. You delete a photo with the × button in its corner.

If you have a freelanceraccount, instead of the image and map sections you'll see the option to move to another salon: you search for the salon by name and press Migrate.

Tip: A clear, well-lit showcase image, plus a gallery with real work samples, helps customers decide faster, they're the first thing they see.

How you promote your salon (QR, Google link, install)

At Promotional materials (QR) you press Print QR Poster, an elegant A4 poster opens, with the salon's name and the app's QR code, ready to print for the door or reception. Customers scan the code and book from their phone. If the poster doesn't open, allow pop-up windows in your browser.

The Install the business panel on your phone card sets up your panel as an app, without app stores. When the browser allows it, the Install now button appears (one-click install); otherwise follow the manual steps:

  1. Android (Chrome): you open stilhub.ro/business, press the menu, choose "Add to Home screen" and confirm.
  2. iPhone / iPad (Safari): you open stilhub.ro/business in Safari, press the Sharemenu, choose "Add to Home Screen" and tap Add.

Below the install card you'll find your unique link for Google (in the form stilhub.ro/salon?id=...): you press Copy and add it to your Google Business profile, so the "Book" button sends customers straight to booking. Also here, if the banner appears, you enable notifications so you get alerts for new bookings.

How you change your password

In the Change password section you enter current password (leave it blank if you logged in with Google), then new password (minimum 6 characters) and confirm it in the third field. You press Change password, this action is separate from the rest of the profile, which is saved with the Save.

Tip: Copy the Google link and put it in your Google Maps profile, many customers find you there first and can book without ever searching for the app.

Ready to try StilHub?

Download the app for free and make your first booking in under 30 seconds, or head into the business panel and get your salon started.